 Save
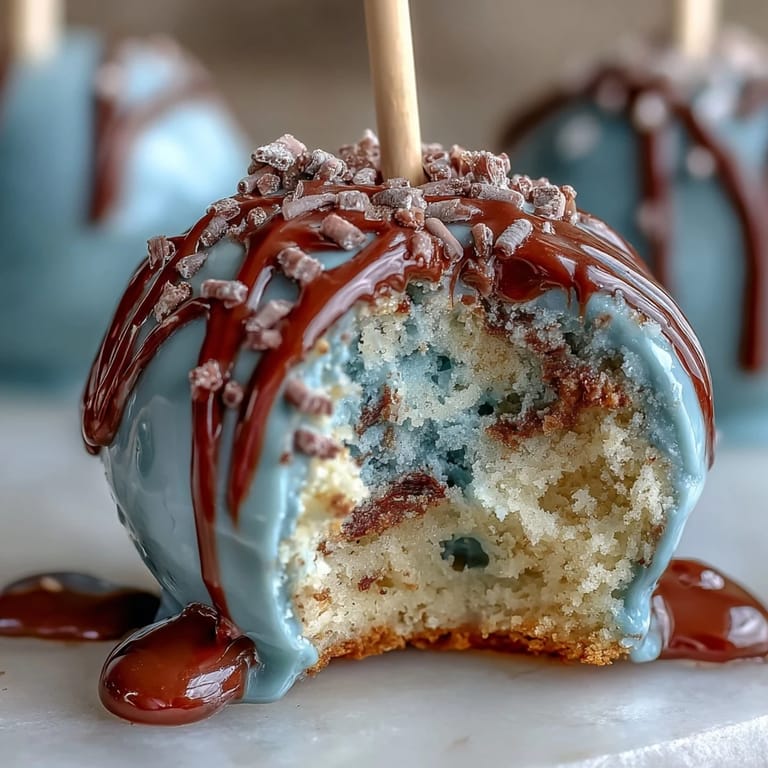
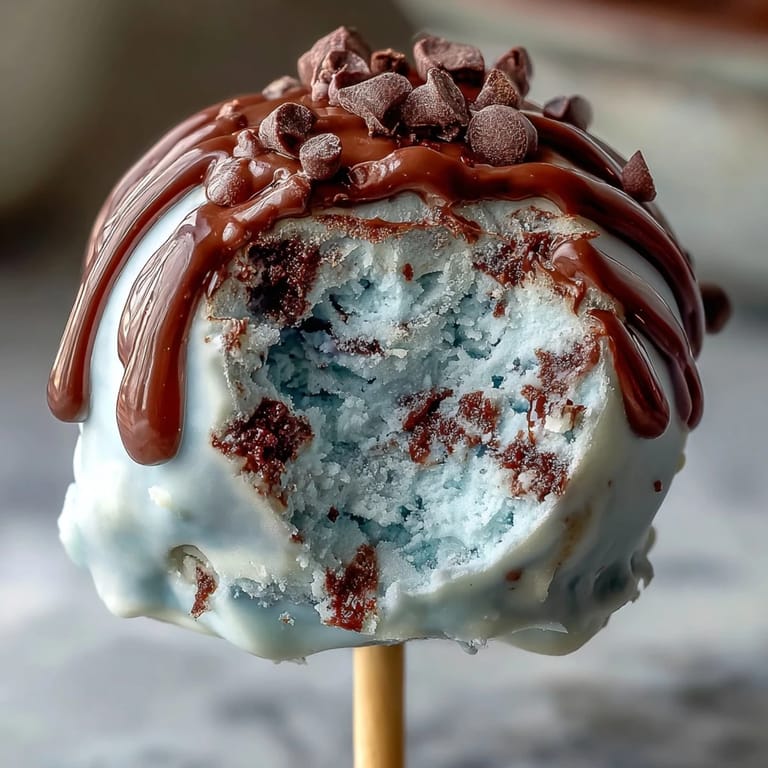
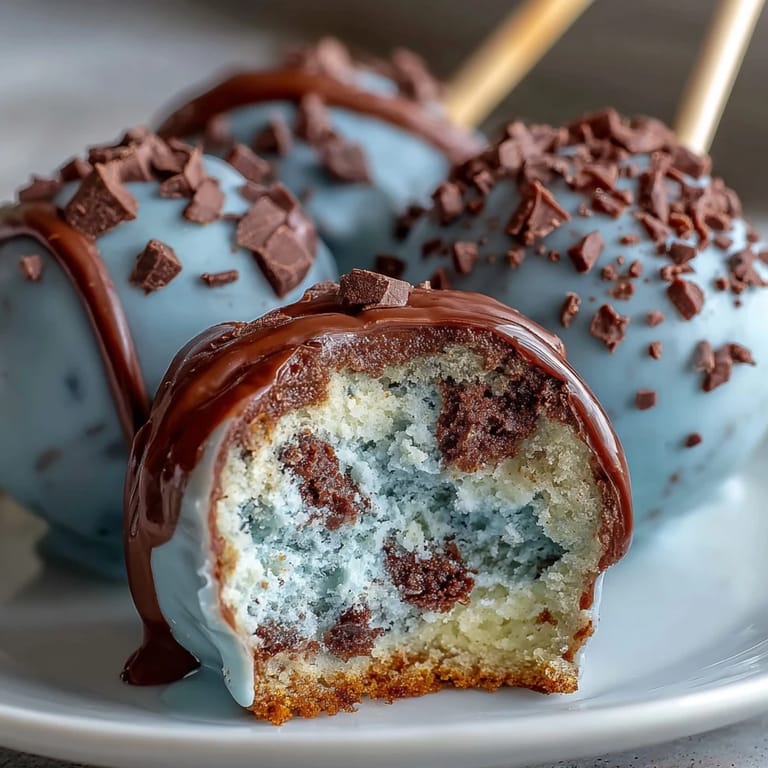
Save My sister texted me a photo of robin eggs she'd found in her garden, and I couldn't stop thinking about their perfect powdery blue color. That weekend, I decided to capture that shade in something edible, and these cake pops were born—delicate little orbs that somehow taste like spring feels. The first batch came out lopsided and unevenly colored, but by the third try, I nailed that robins egg blue that made everyone stop mid-conversation at the Easter table. There's something magical about serving desserts that look like they belong in nature.
I brought these to a spring potluck last year, and watched a usually quiet coworker's face light up when she bit into one. She said they reminded her of Easter mornings as a kid, and suddenly we were swapping childhood dessert memories while standing by the snack table. Small moments like that remind me why baking for people matters so much more than just following a recipe.
Ingredients
- Vanilla cake mix (1 box) or homemade equivalent: This is your foundation, and honestly, box mix takes the stress out while still delivering that tender crumb we're after.
- Unsalted butter (1/2 cup softened): Softening it first makes creaming easier and gives you silkier frosting that binds the crumbs beautifully.
- Powdered sugar (1 1/2 cups): Don't skip sifting this if it's lumpy, or your frosting will have gritty spots.
- Milk (2 tbsp): A little liquid keeps the frosting from being too stiff, though you might need less or more depending on humidity.
- Vanilla extract (1 tsp): Pure extract tastes noticeably better than imitation, especially in something this delicate.
- White candy melts or white chocolate (12 oz): Candy melts are more forgiving for coating, but real white chocolate tastes superior if you're patient with tempering.
- Blue gel food coloring: Oil-based is essential here—water-based coloring will cause the chocolate to seize into a grainy mess, and I learned that the hard way.
- Coconut oil or vegetable shortening (2 tbsp optional): This thins the coating without affecting flavor, making dipping smoother and less wasteful.
- Cocoa powder (1 tbsp) and vodka or extract (1-2 tsp): This creates the speckle effect that gives these pops their authentic robin's egg look.
- Lollipop sticks (24): Food-grade sticks matter because you're holding them while eating.
- Styrofoam block or cake pop stand: This keeps them upright while setting, preventing flat bottoms.
Tired of Takeout? 🥡
Get 10 meals you can make faster than delivery arrives. Seriously.
One email. No spam. Unsubscribe anytime.
Instructions
- Bake and cool your cake:
- Follow the box directions, but don't skip letting it cool completely—warm cake falls apart when you crumble it. I usually bake mine the night before so it's stone cold by morning.
- Make the frosting:
- Cream the softened butter until it's pale and fluffy (about 2 minutes with an electric mixer), then gradually add powdered sugar while mixing to avoid clouds of sugar dust. The milk and vanilla go in last, and you want the final texture to be spreadable but not greasy.
- Combine cake and frosting:
- Crumble that cooled cake into fine pieces—almost like damp sand—then add frosting bit by bit, mixing with your hands until it clumps together when squeezed but doesn't feel like Play-Doh. This usually takes less frosting than you'd think.
- Roll and chill the balls:
- Roll each portion into a compact sphere about the size of a walnut, then place on parchment and freeze for 15 minutes. Chilled balls hold together during dipping instead of falling off the stick.
- Melt and tint your coating:
- Use low heat if doing a double boiler (water shouldn't boil), or microwave in 20-second bursts so the chocolate doesn't overheat and become grainy. Add your blue gel coloring a tiny bit at a time—it's concentrated and spreads fast.
- Stick your cake balls:
- Dip each stick's tip into the warm coating (this acts like glue), then push it carefully into a frozen ball until it's anchored halfway. Chill all of them together for 10 minutes so they're stable for the full dip.
- Dip into the blue:
- Work quickly so the coating stays warm, dipping each pop fully and giving it a gentle spin to shake off excess. Stand them in your foam block and let gravity do the rest—this is when the magic happens as they set into that perfect robin's egg shape.
- Add the speckle effect:
- Mix cocoa powder with just enough vodka or extract to make a thin, brushable paste, then dip a small clean brush and flick it gently toward the pops to create natural-looking speckles. Think bird's egg, not polka dots.
- Final set:
- Leave them undisturbed for at least an hour before touching, longer if your kitchen is warm. I usually let them sit overnight so the coating hardens completely.
 Save
Save The year I perfected these, my daughter asked to help make them for her school bake sale, and watching her carefully paint on the cocky-powder speckles with such concentration was worth more than any compliment. She was so proud when kids lined up specifically for the blue ones, and honestly, that's the whole point of making dessert from scratch.
Why the Robin's Egg Blue Matters
The color itself is what stops people in their tracks—it's unexpected, delicate, and says you put real thought into what you were making. I've learned that edible craftsmanship is its own language, and robin's egg blue speaks spring louder than any pastel plate ever could. Once you nail this shade, you'll find yourself making these for every spring celebration that comes along.
Frosting Variations That Work
The basic buttercream is perfect, but I've experimented with adding almond extract instead of vanilla, and it creates this subtle sophistication that pairs beautifully with the subtle cocoa speckles. Cream cheese frosting makes them tangier and richer, though it requires extra chilling time. The beauty of this recipe is that you can swap flavors while keeping that gorgeous blue shell intact.
Storage and Make-Ahead Secrets
These actually improve slightly after a day because the flavors meld together—the cocoa speckles integrate better with the chocolate coating, creating a more cohesive taste. Room temperature works fine for up to three days, though I prefer refrigerating them in an airtight container to keep that shell glossy and prevent any softening. If you're planning ahead, bake the cake and make the frosting two days early, then assemble everything the night before your event.
- Let them reach room temperature for 10 minutes before eating so the frosting isn't rock hard.
- Store in layers separated by parchment to prevent the coating from sticking together.
- Bring extra because people will ask for seconds, and you'll want to have them ready.
 Save
Save These cake pops are proof that sometimes the most impressive desserts come from the simplest ingredients and a little patience. Once you make them once, you'll have them in your rotation forever.
Recipe Questions & Answers
- → What gives the coating its blue color?
Oil-based blue gel food coloring is mixed into melted white chocolate or candy melts to achieve the vivid robins egg blue shade.
- → How do I create the speckled effect on the bites?
Mix cocoa powder with vodka or a clear extract and gently flick it over the coated treats with a small brush for charming speckles.
- → Can these be made ahead of time?
Yes, once coated and set, the treats can be refrigerated or stored at room temperature for several days while maintaining freshness.
- → What is the best way to ensure the coating sets properly?
Stand the coated bites upright on a Styrofoam block or cake pop stand until fully set to avoid smudging and maintain shape.
- → Are there alternatives to vanilla for frosting flavor?
Adding lemon or almond extract to the frosting offers a delicious twist to complement the sweetness.